
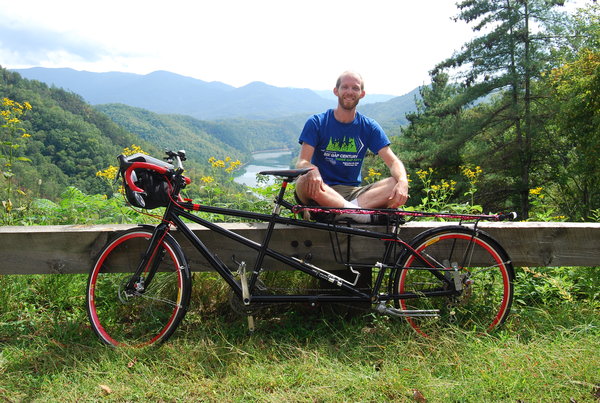
Meet Sydney Elizabeth Nightengale Rothschild — a long name for a long bike. A cargo/touring build imagined in the head of an unconventional cyclist, realized through ingenuity, and assembled at Bikes & More in Gainesville, FL.
The idea behind this bicycle was to afford myself trailer-like capacities, sans-trailer. With the heaviest items packed to the front of the panniers, I kept most of the weight within my center of gravity, and simplified the packing process. Two wheels on the road (versus three or four) minimizes the rubber-to-road friction, while the long wheelbase affords a more comfortable ride. And it looks…a bit weird! This configuration’s conversational potential alone proves valuable on tour, where a casual chat might lead to directions, advice, or even a place to stay.
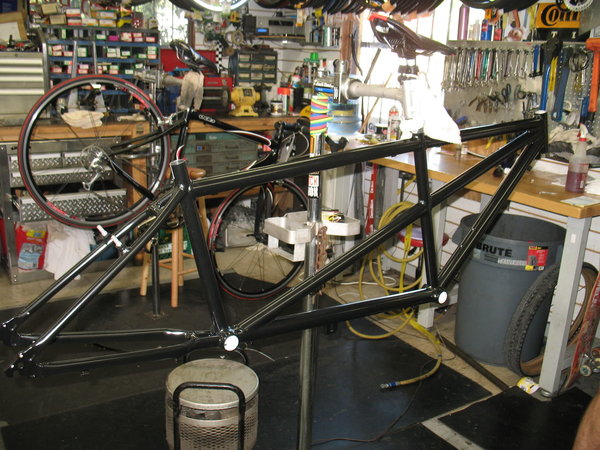
This bicycle started life as a Chinese-made frame branded “Tonino Lamborghini”. The price was right, and the reviews indicated that the frame and welds were solid, but the included components left a bit to be desired. While 7005 aluminum alloy may not the best material for a touring cycle, the lighter-weight aluminum shaves off some critical pounds in consideration of the overall length of the vehicle. All components save the seat posts were cycled forward to the local bicycle collective, and the frame was sent to Powdercoating of Gainesville for a new “satin black” finish. Pun intended.

I welded the custom rack from 3/8″OD steel tubing–a material I can work with in my garage, and also more easily serviced on-the-road should any of my welds fail. The rack and stoker handlebar stem (which keeps it securely mounted to the seat post) were also power coated black along with the frame, for a unified look. The rack design incorporated eyelets along the inside of the top rails to provide a multitude of locations for hooking bungee cords, but more importantly, to allow the lacing of rope to create an upper deck–saving the weight of a steel equivalent. Bits of steel rod in key locations provide lateral stability. One of the steel-washer eyelets broke during the lacing of the deck (nothing a quick zip-tie couldn’t handle) but the rest of the joints survived the arduous 1300-mile tour that included the Blue Ridge Parkway. The rack mounts to the bicycle using the stoker handlebar and seat mounts, and the typical rack-mount eyelets on the rear dropouts.
The panniers are red Cordura underlayered with waterproof tarp for maximum wearability and weather resistance. The result of a collaboration between myself and accomplished-touring-cyclist-and-seamstress Katie Kapugi, they feature interior velcro strips and corrugated plastic panels which can be moved to accommodate different loads. Mounting hardware is from Jandd, bolted to a sewn-in plastic peg-board backing which is drilled out for weight reduction. Heavy-duty zippers close the top of the packs and nylon straps further secure them to the rack.
The headtube surfaces were faced before installing a Cane Creek S3 headset and Nashbar cyclocross fork. The carbon-fiber cyclocross fork saves a few grams and the shortened trail tightens up the turning radius.

The drivetrain is a conventional configuration. After facing the bottom bracket shell, i installed an Ultegra sealed-cartridge bottom bracket and triple-chainring crankset (52/39/30) mated to an Ultegra 10-speed 12-27 cogset and long-cage dérailleur. Two linked chains span the distance between the drive components, requiring a mid-mounted chain tensioner to take up excessive slack. I made my own tensioner from a longboard wheel and mounted it using a lengthy, threaded carriage bolt on the bracket originally intended for the tensioner that held the chain between the captain and stoker bottom brackets. The stoker bottom bracket was not used and remained empty. This may have been a good place to locate a generator of sorts? Ultegra SIS Brifters on a set of Easton handlebars provide no-letting-go controls with a myriad of places to rest the hands for all-day touring comfort.
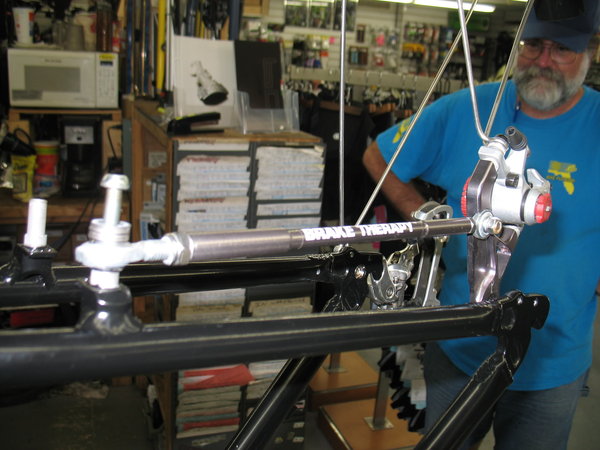
For this mountainous venture, disc brakes seemed like the only option. The front disc caliper was no problem–the cyclocross fork afforded tabs for the Avid BB7 caliper. The rear caliper required a different solution–the frame wasn’t designed with disc tabs on the rear fork, and i am not equipped to heat-treat aluminum welds. The staff at Therapy Components came through, however, custom making a 700C version of their Brake Therapy disc adapter. Their adapter attaches to the cantilever brake boss and hugs the (provided) replacement cone on the Shimano Deore XT rear hub, allowing the mounting of the other disc caliper.
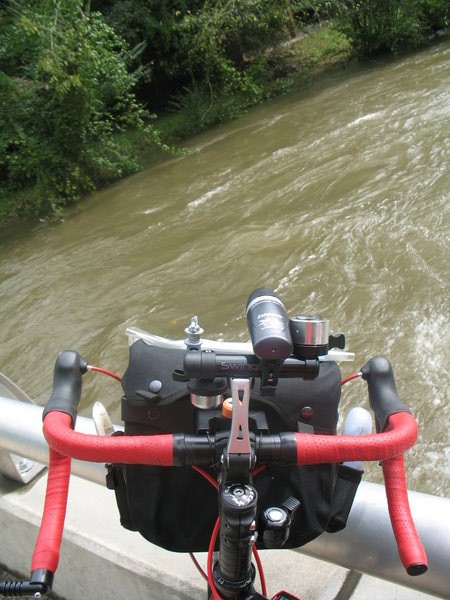
My Ortlieb handlebar bag, while performing perfectly, sat high above the fender–obstructing the pathway for the headlight. So, i employed a SwingGrip handlebar extension to provide convenient mounting locations for my accessories. In this space I mounted a headlight and bell, and a camera-mount i constructed using an old reflector mount, a carriage bolt, and several nuts, lockwashers, and a wing nut.
A bicycle like this needs a special kickstand, and the solution came from Switzerland. The Pletscher Double contains a spring mechanism that guides both legs of the stand to the non-drive side with a single fluid motion. The bicycle stands upright on both legs equally, similar to a motorcycle on a center-stand. This proved useful, for as heavy as this bike was, flipping it over to change a flat would have consumed much time. The double allowed me to rock the bicycle forward or backward to remove or install either wheel while the bicycle remained upright. As the case was, i suffered only one flat for the entire tour!
My recent tour from Decatur, GA to Durham, NC by way of The Blue Ridge Parkway proved this configuration to perform exactly as anticipated. I was able to carry sufficient supplies (and more!) to keep myself on the road without support for the lengthy stretches between populated areas along the parkway. The ride was smooth and comfortable, and the bicycle felt about as nimble as any other well-laden touring cycle.
This design is not dissimilar to some commercial offerings, such as the Surly Big Dummy, or the Extracycle conversion kits. My build may have been less expensive, and also required a bit of ingenuity to find solutions where my use of this frame was different from its intended use.
Crazy Guy on a Bike.com Blue Ridge Tour Journal
Hi Andy,
It was great getting to meet you and your loooong bike on your tour. The bike looked like a great multi-use Sport utility vehicle. You inspired me to do some bike-tinkering of my own.
Cheers, Jack
Thank you, Jack! The pleasure was all mine, i’m sure 🙂
I’d love to hear the latest about your bicycle rebuild.
Andy
Pingback: Speedlinking 5 February 2010 :: Treadly and Me
Pingback: Touring project for McCracken « In The Spin